
By Jenifer Frazer1
Trudi Davidoff invented modern winter sowing in the early 2000s under eastern conditions. She used disposable plastic food storage containers and milk jugs but I had issues with those methods in our windy, dry, sunny environment. So I poked around on her website and found someone else’s idea for winter sowing in plastic bags. I have had great success with that. My only addition to the design was to add a wooden skewer to keep the bags more propped open. Trudi manages a Winter Sowers Facebook group that you may join to learn more and ask questions from others who use this method.
When to winter sow natives? From the Winter Solstice to the Spring Equinox is prime time, but many germinate even if sowed sooner or later. I like to start after the holidays so I get a bit of a gardening break from first frost to January, but there’s no reason you couldn’t start in November or December.
Step 1: Seed Appreciation
Get a hand lens. Study your seeds! Enjoy their beauty and this under-appreciated phase of plants’ lives. A seed is a pre-packaged baby plant with a lunch box. It is an amazing product of natural selection so take time to appreciate its sculptural and artistic qualities.
Prep your seeds by counting them out ahead of time if you will be sowing in small groups (that is, if you have limited seed or know they have a high germination rate).
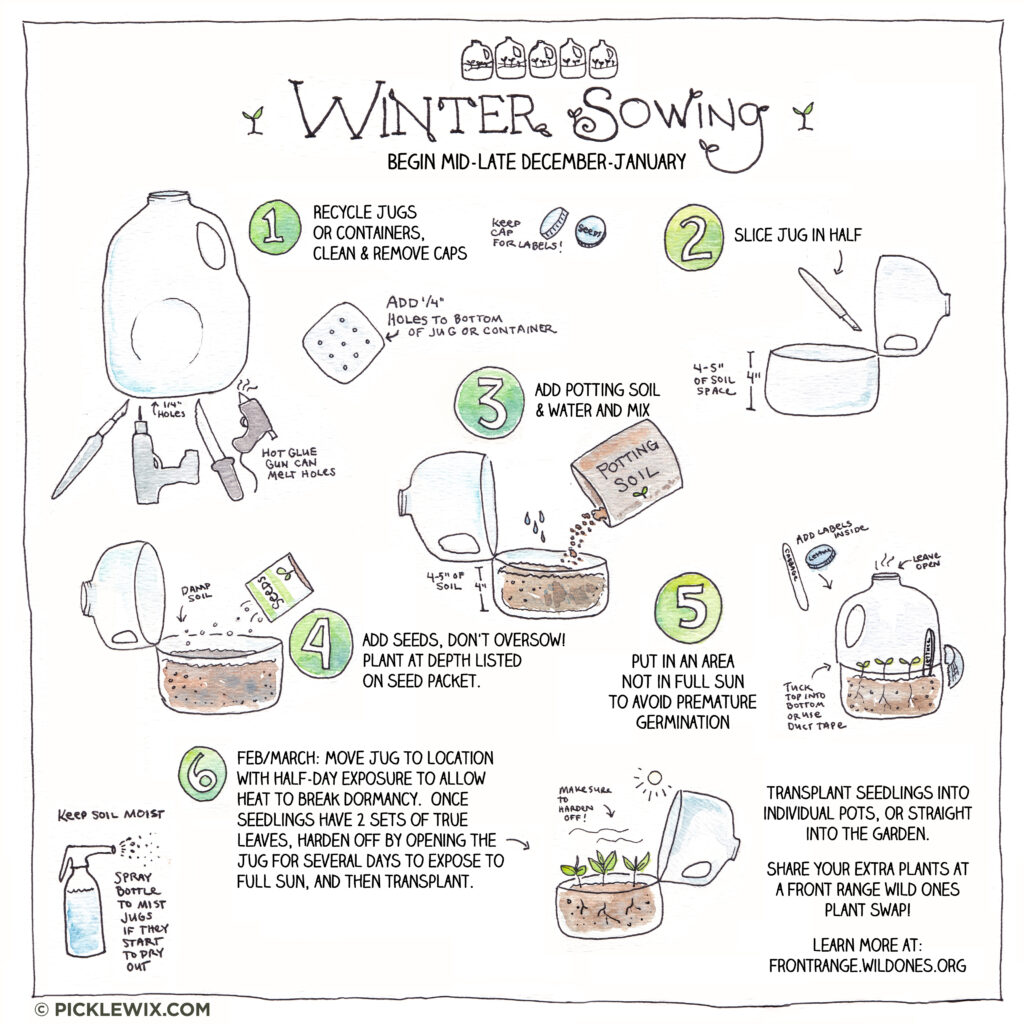
Step 2: Make Your Container
Purpose of the container: to retain moisture, to protect seedlings from our destructive winds and pests, and to speed germination by increasing early-season heating (good greenhouse effect).
Is plastic necessary? It kind of is. No other material shares its properties of being lightweight, flexible, easily cuttable, and transparent. This is a noble use of plastic, in my opinion. Reused inexpensive plastic containers are the best! Have your friends and neighbors save them for you. Or, in a pinch, new works too.
There are many winter sowing container options:
Gallon-sized Zipper-loc bag, wooden kebab skewers, and clothes pins
You can winter sow in many reused plastic containers but this is my favorite because it is easy to make and to adjust the ventilation as it gets warmer, then colder again. Clip the bottom corners, then make a skinny V-shaped notch in the center of the bottom for drainage. Easily cleaned and folds flat for convenient storage for next year.
Milk jug or two-liter bottle plus duct tape
This is a very popular option (Google it for instructions on how to build) but it requires work to get that milk jug cut and drainage holes added and not so easy to ventilate as it warms up. Also, the duct tape used to close them tends to dry up and start to peel off before the season is over here.
Here’s a graphic one of our members and volunteers, Idelle Fisher made to show how to use this technique:
Any plastic container with sufficient head space to grow plants
People have used all kinds of crazy containers. Just don’t forget to cut drain holes and ventilation holes. The container should be able to hold 2-3 inches of soil on the bottom and another 4-6 inches above.
Additional Materials
You will need a few more items to set up your winter sowing containers:
- Tape + indelible pen — label everything and stick labels to the BOTTOM of the container as the sun will bleach it out otherwise
- Potting mix — need the light and fluffy stuff but not expensive sterile seed starting mix. The cold conditions outside will keep fungi and other pathogens in check.
Step 3: Fill Your Container with Potting Mix
I like to fill the containers in the sink, but make sure you have a grinder if you do this. It’s warm inside, I can listen to music while I work, I get to get my hands dirty and smell soil in January, I can do a few bags at a time each day — there’s no rush. You have all winter! — and I can use the sprayer in my sink to gently moisten the soil. Fill the bag about half full. You want it to be soaking wet all the way through. Gently press down on the soil to compact it some.
You need 2-3 inches of soil in bag after watering and compaction, or about 1/3 full. You have to get it that deep so that your container will retain enough water outside. Small containers (quart-sized bags, etc.) and shallow soil will be much more challenging (read: more work for you) to keep moist through the entire winter and spring, and small-volume soil also tends to overheat. That said, I have had success in quart-sized bags.
Step 4: Sow Seeds
Use dry hands to pick up and drop seeds — it will be maddening with wet hands as the seeds will stick.
You can either scatter seeds randomly or plant in small groups. Planting in small groups conserves seed and reduces the amount of thinning you will need to do later.
Either make depressions in the soil to approximate depth listed on seed packet and cover or sprinkle dirt on top to required depth. Or just crumble up some seed-containing material on top, as Mother Nature does. Moisten.
Finally, close the bags so that there is an opening about 2” in diameter on one side. Use a clothes pin to prop that hole open on the far side of the bag and stick a wooden skewer inside that opening into the soil to keep the hole open.
Step 5: Take Containers Outside
Take your bags outside and let nature do the work! Your plants will germinate when the conditions are perfect. The weather will tell them what to do and when to do it. Put them somewhere they will get at least some sunlight and are also fully exposed to the sky so they get rain and snow.
Step 6: Monitor Containers Between Sowing and Planting
If wind or snow collapses the bag, just pull them back upright when the wind stops or the snow melts.
Check frequently to make sure your container is always heavy and always has condensation on the inside in warm weather. If it doesn’t, you need to add water — gently, so the seeds aren’t disturbed. You can either run water down the side of the bag, or use a hose with a mist attachment, or water from below by placing the bag in a container filled with an inch of water. Warning: do not leave your bags in a big container as the first time a big snow melts in it, you will have seedling soup and you may not notice for a while.
As the season gets warmer, you must gradually open up your container using the slider or un-tape milk jugs to ventilate. Your seeds/plants will cook on hot days if you don’t increase the ventilation! With natives, err on the side of taking the cover off or opening the bag sooner rather than later. They can handle our harsh conditions and the danger from overheating is greater. However, the more you open your containers, the more watering you will have to do before you plant. Opening the bags will also harden your plants off gradually to wind. They will be naturally hardened off to cold and sun already.
Somewhere between 10-40% of your bags may not geminate because the conditions weren’t right that year. Oh well! Maybe next year.
Step 7: Plant
Try to do it when the plants are still pretty small and haven’t got close to outgrowing the container. One or two true leaves is best. When they are this small, they may not even notice they have been transplanted. On the other hand, if rabbits or other munching pests are a concern, you may want to wait until they are bigger.
Gently remove your plants from their containers by sliding the lump of soil and roots out the side of the bag. No need to cut the bag. Break into chunks. Consider bare rooting: shaking most of the soil off of the roots of the plant. Natives generally prefer native soil in the ground. If you bare root, make sure it is not one of the natives that hate this (looking at you Ipomoea leptophylla).
Rinse your bags (use dish soap if necessary), dry, and press flat to store for next year.
Even natives need extra water while they are getting established, so do that for a few weeks at least and maybe later in the year if it’s really dry.
Step 8: Enjoy the Fruits of Your Labor
You will have a huge sense of pride watching plants you handled as seeds grow and feed wildlife and your soul.
Step 9: Convert your Friends, Relatives, and Neighbors
Everyone deserves this inexpensive joy.
Curious to learn more about transforming your garden into a habitat with Colorado native wildflowers, grasses, shrubs, and trees? Check out our native gardening toolkit, register for an upcoming event, subscribe to our newsletter, and/or become a member – if you’re not one already!
- Jennifer Frazer is an enthusiastic home gardener and biologist turned science writer who for nine years wrote a natural history blog at Scientific American called “The Artful Amoeba”. She’s been propagating her own plants via winter sowing in plastic bags for six years for use in her own garden, which takes up the whole back yard, and last year when she discovered the importance of native plant gardening she resolved to propagate her methods too. She has taught mushroom and lichen classes for the Boulder County Nature Association and the Rocky Mountain Conservancy and was twice a featured guest on Radio Lab, speaking about the fungi that live in association with tree roots and about plant intelligence (From Tree to Shining Tree and Smarty Plants episodes). She is currently writing a book about slime molds. ↩︎